Trigger Power Automate from Smart Flows
This section explains how we can trigger a Microsoft Power Automate flow from Experlogix Smart Flows. A practical scenario would be to save data back in Microsoft Dynamic 365 CE. In most cases, the data to save back in Microsoft Dynamic 365 CE comes from a Smart Form or custom Data Set.
Prerequisite
- Access to Microsoft Power Automate.
- Have a Smart Flow already created.
|
1.
|
In Power Automate, create a new Instant cloud flow. |
|
2.
|
As a trigger, select When a HTTP requested is received. |
|
3.
|
In the When a HTTP request is received trigger, use the Use sample payload to generate schema option to create the JSON body. You'll need to provide a sample JSON payload in that process, see below for details. |
For instance, if you want to update the description of an account, the JSON payload could be something like this:
Copy
1
2
3
4
5
6
{
  "account": {
    "id": "",
    "description": "Test YM"
  }
}
By using the 'Generate from sample', the sample JSON payload will be wrapped and look like this:
Copy
1
2
3
4
5
6
7
8
9
10
11
12
13
14
15
16
{
  "type": "object",
  "properties": {
    "account": {
      "type": "object",
      "properties": {
        "id": {
          "type": "string"
        },
        "description": {
          "type": "string"
        }
      }
    }
  }
}
You'll notice that the HTTP POST URL is empty at this point. It is automatically generated after you save the flow.
The best way to update a record in Microsoft Dynamics 365 CE is to use the Common Data Service action.
|
4.
|
Click on + New Step to add a new step. |
|
5.
|
Search for and select the Update a record action. |
|
6.
|
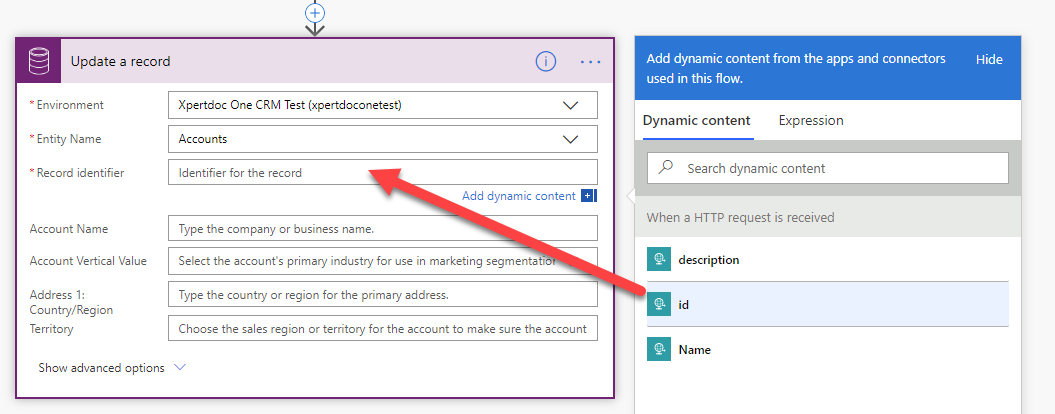
On the Update a record action, configure the following parameters. |
|
6.1.
|
Select an environment. |
|
6.2.
|
Specify the Entity Name (i.e., Accounts). |
|
6.3.
|
Set the Record Identifier. |
In our example, the id comes from our JSON payload, and we'll use dynamic content to set it.
|
7.
|
Update any fields in the account. For each field, use Dynamic Content from the JSON payload to map the parameters. |
|
8.
|
Click the Save button to save your flow. |
|
9.
|
After you save the flow, go back to the first step and copy the auto-generated URL. You'll need it later. |
Example URL: https://prod-112.wesus.logic.azure.com:443/workflows/259e4eb6e54b46cfb5f2f34e921788ae/triggers/manual/paths/invoke?api-version=2016-06-01&sp=%2Ftriggers%2Fmanual%2Frun&sv=1.0&sig=lfaW4YgKQUa_Nml-Dk8T6Enz0Lnhn-4aeQd8qoVQopw
Example Base Path: "https://prod-112.westus.logic.azure.com:443
|
10.
|
In the Smart Flows Project Console, create a new HTTP(s) connector. For the base path, set it using the first part of the URL grabbed in the previous step. |
|
11.
|
Set the Authentication type to None. |
|
12.
|
Leave the other values empty. |
|
13.
|
Save the HTTP connector in Smart Flows. |
|
15.
|
Configure the flow block to use the HTTP connector you created. |
|
15.1.
|
For the Path attribute, copy the remaining portion of the URL (i.e., starting at "/workflows/......"). |
|
15.2.
|
Set the Method as POST. |
|
15.3.
|
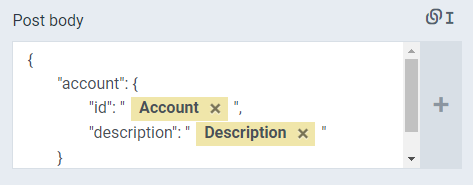
For the Post Body, add a JSON payload. You can use the linked field to dynamically set values from any data set. |
|
16.
|
Save your flow in Smart Flows. |
Congratulations, you’ve configured the system so that each time the flow executes in Smart Flows, the system performs an HTTP request to Power Automate.